지난 글 Kubernetes 01 – Pod 에서는 K8s(Kubernetes)의 가장 작은 배포 단위인 Pod에 대해서 설명했었다.
오늘은 ReplicaSet에 대해서 이야기 해보려고 한다.
지난 글에서 K8s의 상태를 나타내는 엔티티를 Object라 하고, Object가 Spec에 정의된 상태로 유지될 수 있도록 지속적으로 변화시키는 주체를 Controller라고 설명했었는데, ReplicaSet은 Pod (Object)을 복제 생성하고, 복제된 Pod의 개수를 (Spec에 정의된 개수만큼) 지속적으로 유지하는 Controller다.
ReplicationController vs ReplicaSet
ReplicaSet 공식 문서를 보면 ReplicaSet을 ’ReplicaSet is the next-generation Replication Controller’ 라고 설명하고 있다. ReplicationController는 deprecated될 예정으로, 현재는 기존 ReplicationController가 하던 역할을 ReplicaSet과 이후에 설명할 Deployment가 대신하고 있다.
오늘은 ReplicaSet의 이해를 위해
kind: ReplicaSet을 명시해서 예제를 작성하겠지만 실제로 클러스터를 구성해서 사용할 때는 ReplicaSet을 별도로 정의해서 사용하기보다, Deployment를 정의하는 spec에replicas: 3과 같이 간단히 정의해서 ReplicaSet을 사용할 수 있다.
ReplicationController에서 ReplicaSet으로 변경되면서 달라진 점 중 한가지는 set-based selector의 지원이다.
ReplicaSet은 관리할 대상 Pod을 찾을 때 Label에 매칭되는 Pod을 찾게(Selecting)되는데,
이 때 ReplicationController는 동일한 문자열의 Label만 찾을 수 있는 반면 ReplicaSet은 다음과 같이 In, NotIn, Exist, DoesNotExist operator를 사용해서 찾을 수 있다.
selector:
  # ReplicationController는 matchLabels만 사용가능
  matchLabels:
    component: redis
  matchExpressions:
    - {key: tier, operator: In, values: [cache]}
    - {key: environment, operator: NotIn, values: [dev]}
    - {key: service, operator: Exists, values: [user]}
    - {key: service, operator: DoesNotExist, values: [db]}
좀 더 자세한 내용은 Labels and Selectors 공식문서에서 확인할 수 있다.
ReplicaSet을 사용해보자.
자세한 설명에 앞서 ReplicaSet을 먼저 사용해보자.
다음과 같이 지난 블로그 Kubernetes 01 – Pod 에서 사용했던 hello-node.yml 파일을 수정해서 ReplicaSet을 정의한다.
- hello-node.yml
apiVersion: apps/v1
kind: ReplicaSet
metadata:
  name: hello-node
  labels:
    service-name: hello-node
spec:
  replicas: 2
  selector:
    matchLabels:
      service-name: hello-node
  template:
    metadata:
      name: hello-node
      labels:
        service-name: hello-node
    spec:
      containers:
      - name: hello-node
        image: asbubam/hello-node
        readinessProbe:
          httpGet:
            path: /
            port: 8080
        livenessProbe:
          httpGet:
            path: /
            port: 8080

---
apiVersion: v1
kind: Service
metadata:
  name: hello-node
spec:
  type: LoadBalancer
  ports:
  - port: 8080
    targetPort: 8080
  selector:
    service-name: hello-node
자세한 내용 설명은 이후에 하기로 하고 우선 hello-node.yml 파일을 사용해서 ReplicaSet을 생성해보자.
# kubectl get pods 명령으로 Pod list를 조회해보면 아직 아무것도 없다.
$ kubectl get pods
No resources found.

# kubectl create -f {yaml 파일명} 으로 ReplicaSet을 생성한다.
$ kubectl create -f hello-node.yml --save-config
replicaset "hello-node" created
service "hello-node" created

# kubectl get rs 명령의 결과에서
# DESIRED 2: hello-node ReplicaSet은 2개의 pod을 기대하고 있고
# CURRENT 2: 2개의 Pod이 Node에 배치되었으며
# READY 0: 아직 2개의 Pod 모두 health check에 성공하지 못했음을 알 수 있다.
$ kubectl get rs # 혹은 kubectl get replicasets
NAME         DESIRED   CURRENT   READY     AGE
hello-node   2         2         0         3s

# 조금 시간이 지난 뒤 다시 kubectl get rs 명령을 실행해보거나, watch를 사용해서 $ watch kubectl get rs 명령으로 상태를 갱신하다보면 2개의 Pod이 모두 READY 상태로 변경된다.
$ kubectl get rs
NAME         DESIRED   CURRENT   READY     AGE
hello-node   2         2         2         13s

# hello-node Pod 한개만 실행했을 때와는 다르게 Pod Replication을 구분할 수 있도록 Pod 이름에 `-{hash}`가 붙어 있음을 확인할 수 있다.
$ kubectl get pods
NAME               READY     STATUS    RESTARTS   AGE
hello-node-l6ddj   1/1       Running   0          1m
hello-node-z5llh   1/1       Running   0          1m
동일한 역할을 수행하는 2개의 hello-node Pod이 생성되었는데, HTTP 요청은 2개의 Pod 중 어떤 Pod으로 연결되는 것일까? 그리고 그 연결은 어떻게 이뤄지는걸까?
이 부분에 대한 내용은 다음 글 Service 에서 설명할 예정이다. 여기서는 외부에서 Service를 통해 분산되어 있는 Pod Replication에 요청이 balancing된다는 사실만 알고 넘어가자.
ReplicaSet이 생성되는 과정
kubectl create 명령으로 ReplicaSet 생성을 요청하면 다음과 같이 ReplicaSet을 생성하고, ReplicaSet Controller에 의해서 Pod을 생성한다.
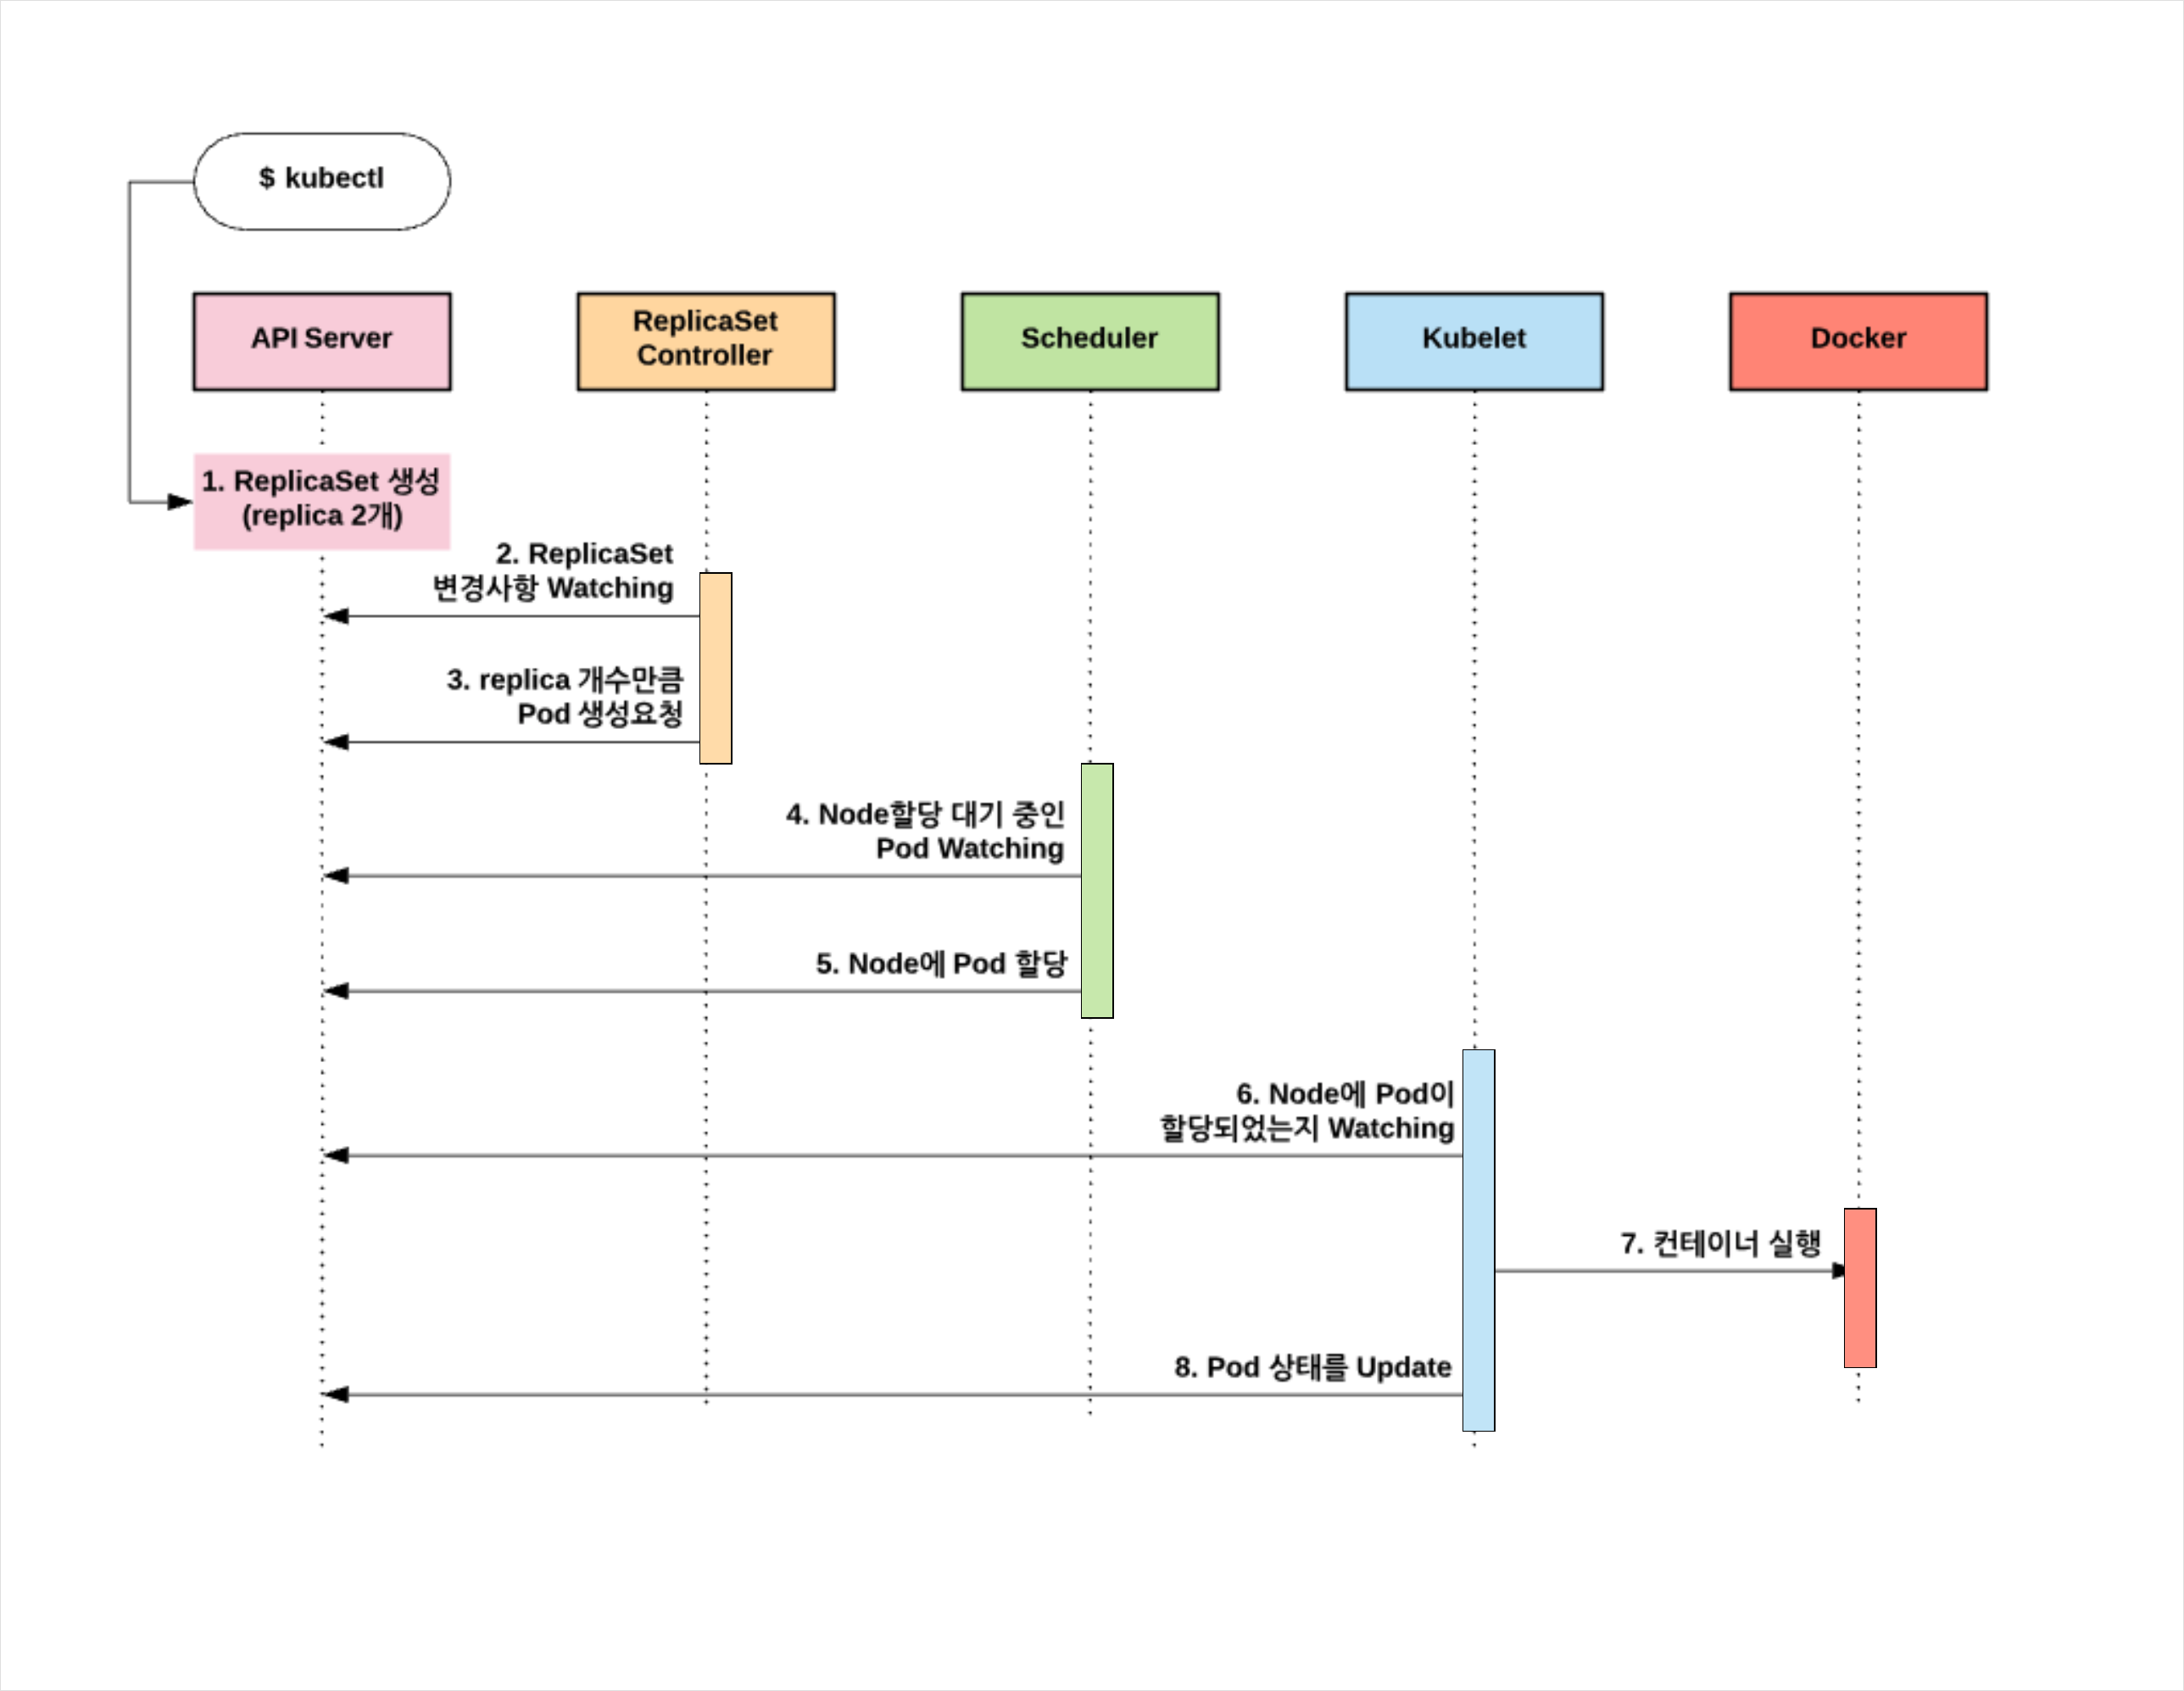
크게보기 ref: The DevOps 2.3 Toolkit: Kubernetes
그림에는 빠져있지만 Pod 생성과정에서 설명했던 것과 같이, 모든 상태는 Etcd에 저장되고 ReplicaSet Controller, Scheduler, Kubelet등은 Etcd에 바로 접근하는 것이 아니고 API Server를 경유해서 Etcd의 데이터에 접근함을 기억하자.
kubectl describe rs 명령의 결과에서 ReplicaSet Controller에 의해서 2개의 Pod이 생성되었음을 확인할 수 있다.
$ kubectl describe rs hello-node
Name:         hello-node
Namespace:    default
Selector:     service-name=hello-node
Labels:       service-name=hello-node
Annotations:  <none>
Replicas:     2 current / 2 desired
Pods Status:  2 Running / 0 Waiting / 0 Succeeded / 0 Failed
Pod Template:
  Labels:  service-name=hello-node
  Containers:
   hello-node:
    Image:        asbubam/hello-node
    Port:         <none>
    Liveness:     http-get http://:8080/ delay=0s timeout=1s period=10s #success=1 #failure=3
    Readiness:    http-get http://:8080/ delay=0s timeout=1s period=10s #success=1 #failure=3
    Environment:  <none>
    Mounts:       <none>
  Volumes:        <none>
Events:
  Type    Reason            Age   From                   Message
  ----    ------            ----  ----                   -------
  Normal  SuccessfulCreate  2m    replicaset-controller  Created pod: hello-node-ldfbx
  Normal  SuccessfulCreate  2m    replicaset-controller  Created pod: hello-node-dhx26
hello-node.yml 자세히 읽어보기
hello-node ReplicaSet 생성에 사용했던 hello-node.yml 파일의 각 항목에 대해 알아보자.
apiVersion: apps/v1 # apps 는 api endpoint의 group을 의미한다.
kind: ReplicaSet
metadata:
  name: hello-node # ReplicaSet의 고유 이름
  labels:          # 외부에서 ReplicaSet을 찾을 때 사용할 label. 복수의 label 입력가능
    service-name: hello-node
spec:              # 기대되는
  replicas: 2      # 2개의 Pod 복제(replica)를 생성한다.
  selector:        # 위에서 설명했던 Label Selector - 이 Label에 매칭하는 Pod을 관리
    matchLabels:   # 여기서는 label이 동일한 Pod을 select한다.
      service-name: hello-node # service-name label이 hello-node인 Pod을 2개 유지
  template:        # Pod 생성 시 사용할 template를 정의한다. 기존의 Pod 정의와 동일하다.
    metadata:
      name: hello-node
      labels:
        service-name: hello-node
    spec:
      containers:
      - name: hello-node
        image: asbubam/hello-node
        readinessProbe:
          httpGet:
            path: /
            port: 8080
        livenessProbe:
          httpGet:
            path: /
            port: 8080

--- # 한개의 yaml파일에 여러개의 Object를 정의할 때 구분자로 사용한다.
# Service Object 정의 - 다음 글에서 자세히 설명한다.
apiVersion: v1
kind: Service
metadata:
  name: hello-node
spec:
  type: LoadBalancer # 외부에 Pod을 어떤 형태로 노출할지 결정
  ports:
  - port: 8080       # 외부에 노출할 포트
    targetPort: 8080 # 컨테이너의 포트
  selector:
    service-name: hello-node # Service가 연결할 대상 Pod의 label
- 지난번 Pod 생성 시에는 apiVersion이
v1이었는데, ReplicaSet 생성시에는apps/v1을 사용하고 있다. apps는 api endpoint의 group을 의미한다. ref: API groups - spec.template 하단의 내용은 Pod 생성 시 사용했던 hello-node.yml 파일의 내용과 동일하다.
- ReplicaSet 정의를 위해서는
replicas: 2로 replica 개수를 설정하고,matchLabels (label selector)를 통해서 ReplicaSet의 관리대상 Pod을 정의하는 것이 전부다. - ReplicaSet의 설명을 위해
kind: ReplicaSet을 사용해서 파일을 작성했지만, 실제 사용할 때는 앞에서 설명했던 것처럼kind: Deployment의 replicas 항목을 추가하는 것으로 ReplicaSet 정의가 가능하다.
Pod replica 개수를 변경해보자.
ReplicaSet을 사용해서 Pod을 복제했다. 예제에서는 2개의 Pod replica를 생성했지만 이 개수는 언제든 변경될 수 있다. 다음과 같이 replicas: 3으로 파일 내용을 변경한 후 클러스터에 적용해 보자.
$ vi hello_node.yml

replicas: 2 # 를 replicas: 3으로 변경 후 저장

$ kubectl apply -f hello-node.yml
replicaset "hello-node" configured
service "hello-node" configured
service는 변경하지 않았음에도 service “hello-node”
unchanged가 아닌configured로 표시되는 것은 Replica 개수가 변경되면서 Service의 대상이 되는 Pod endpoint가 추가/변경 되었기 때문이다. 이 부분은 이후에 Service에 대한 설명에서 좀 더 알아보도록 하자.
새로운 Pod이 한개 추가되어 3개의 Pod이 실행상태로 유지된다.
$ kubectl get pods
NAME               READY     STATUS    RESTARTS   AGE
hello-node-9n6f2   1/1       Running   0          5m
hello-node-hqthm   1/1       Running   0          5m
hello-node-jbvgl   1/1       Running   0          1m

$ kubectl get rs
NAME         DESIRED   CURRENT   READY     AGE
hello-node   3         3         3         5m

$ kubectl describe rs hello-node
Name:         hello-node
Namespace:    default
...
Events:
  Type    Reason            Age   From                   Message
  ----    ------            ----  ----                   -------
  Normal  SuccessfulCreate  5m    replicaset-controller  Created pod: hello-node-9n6f2
  Normal  SuccessfulCreate  5m    replicaset-controller  Created pod: hello-node-hqthm
  Normal  SuccessfulCreate  1m    replicaset-controller  Created pod: hello-node-jbvgl
Pod 의 복구
ReplicaSet은 Pod의 개수를 desired 상태로 유지한다.
다음과 같이 1개의 Pod을 종료 시키면 ReplicaSet은 새로운 Pod을 생성한다.
(생성 과정은 위에서 설명했던 그림과 동일하다.)
$ kubectl get pods
NAME               READY     STATUS    RESTARTS   AGE
hello-node-9n6f2   1/1       Running   0          5m
hello-node-hqthm   1/1       Running   0          5m
hello-node-jbvgl   1/1       Running   0          1m

# hello-node-9n6f2 pod을 삭제한다.
$ kubectl delete pod hello-node-9n6f2
pod "hello-node-9n6f2" deleted

# 1개의 Pod(hello-node-f2j2r)이 새롭게 생성된다.
$ kubectl get pod
NAME               READY     STATUS              RESTARTS   AGE
hello-node-f2j2r   0/1       ContainerCreating   0          0s
hello-node-hqthm   1/1       Running             0          6m
hello-node-jbvgl   1/1       Running             0          1m

# kubectl describe 명령의 결과에서 1개의 Pod이 ReplicaSet Controller에 의해 새롭게 생성되었음을 확인할 수 있다.
$ kubectl describe rs hello-node
Name:         hello-node
Namespace:    default
...
Events:
  Type    Reason            Age   From                   Message
  ----    ------            ----  ----                   -------
  Normal  SuccessfulCreate  6m    replicaset-controller  Created pod: hello-node-9n6f2
  Normal  SuccessfulCreate  6m    replicaset-controller  Created pod: hello-node-hqthm
  Normal  SuccessfulCreate  5m    replicaset-controller  Created pod: hello-node-jbvgl
  Normal  SuccessfulCreate  35s   replicaset-controller  Created pod: hello-node-f2j2r
ReplicaSet은 관리 대상 Pod을 어떻게 찾을까?
ReplicaSet은 Label을 통해서 관리 대상 Pod을 selecting 한다고 했는데, 그럼 Pod에서 해당 Label을 삭제하면 어떤 현상이 발생하게될까? 간단히 실험해보자.
먼저 —show-labels 옵션을 사용해서 현재 생성되어있는 Pod을 조회해 보자.
$ kubectl get pod --show-labels
NAME               READY     STATUS    RESTARTS   AGE       LABELS
hello-node-d5977   1/1       Running   0          39m       service-name=hello-node
hello-node-fnp7c   1/1       Running   0          39m       service-name=hello-node
hello-node-mdh57   1/1       Running   0          39m       service-name=hello-node
여기서 첫번째 hello-node-d5977 Pod에서 service-name Label 을 삭제한다.
# hello-node-d5977 Pod에서 service-name label 삭제
$ kubectl label pods/hello-node-d5977 service-name-
pod "hello-node-d5977" labeled
다시한번 kubectl get pod —show-labels 명령을 실행하면 service-name=hello-node Label을 가진 새로운 container가 생성됨을 확인할 수 있다.
$ kubectl get pod --show-labels
NAME               READY     STATUS              RESTARTS   AGE         LABELS
hello-node-d5977   1/1       Running             0          42m         <none>
hello-node-fnp7c   1/1       Running             0          42m         service-name=hello-node
hello-node-k6v5g   0/1       ContainerCreating   0          <invalid>   service-name=hello-node
hello-node-mdh57   1/1       Running             0          42m         service-name=hello-node
label을 삭제한 hello-node-d5977 Pod은 hello-node ReplicaSet의 대상에서만 제외되었을 뿐, 계속 Running 상태를 유지하고 있음에 유의하자.
hello-node-d5977 Pod에 service-name=helllo-node Label을 다시 추가해보자.
$ kubectl label pods/hello-node-d5977 service-name=hello-node
pod "hello-node-d5977" labeled

# hello-node-d5977 Pod에 Label이 추가되고, ReplicaSet에 의해 Pod 개수는 3으로 유지된다. (한개의 Pod이 ReplicaSet에 의해서 종료된다.)
$ kubectl get pod --show-labels
NAME               READY     STATUS    RESTARTS   AGE       LABELS
hello-node-d5977   1/1       Running   0          47m       service-name=hello-node
hello-node-fnp7c   1/1       Running   0          47m       service-name=hello-node
hello-node-mdh57   1/1       Running   0          47m       service-name=hello-node
ReplicaSet은 Replication관리만 한다.
당연한 이야기지만 ReplicaSet은 Pod의 Replication 관리만 한다. ReplicaSet에 의해 3개의 Pod이 실행 중인 상태에서 ReplicaSet을 삭제하면 실행 중인 Pod은 어떻게 될까?
hello-node ReplicaSet을 삭제해보자.
$ kubectl get rs
NAME         DESIRED   CURRENT   READY     AGE
hello-node   3         3         3         50m

# --cascade 옵션 값은 default가 true다. 여기서는 ReplicaSet만을 삭제하는 테스트를 위해 false로 입력한다.
$ kubectl delete rs hello-node --cascade=false

$ kubectl get pods --show-labels
NAME               READY     STATUS    RESTARTS   AGE       LABELS
hello-node-d5977   1/1       Running   0          50m        service-name=hello-node
hello-node-fnp7c   1/1       Running   0          50m        service-name=hello-node
hello-node-mdh57   1/1       Running   0          50m        service-name=hello-node
cascade=false 옵션으로 ReplicaSet을 삭제할 경우 해당 ReplicaSet의 관리 대상이었던 Pod은 삭제되지 않고 실행상태로 유지 가능하다. ReplicaSet이 Pod을 소유하는 개념이 아닌, 특정한 Label Selector 룰에 따라 Pod의 개수/상태를 유지하는 역할만 수행함을 확인할 수 있다.
정리
Kubernetes의 ReplicaSet Controller에 대해 알아봤다. ReplicaSet은 Pod을 여러개 복제하고, 사용자가 기대하는 상태로 Pod의 개수/상태를 유지하는 역할을 한다. replica 개수는 위에서 설명했던 것처럼 yaml파일이나 명령 수행 시 파라미터 값으로 전달해 고정할 수도 있고, 리소스나 트래픽의 상태에 따라 가변적으로 조정할 수도 있다.
K8s는 자동으로 생성되고, 상황에 따라 중지되거나 부활하거나(?) 추가되는 다수의 Pod 그룹에 어떻게 외부/내부 요청을 연결해 주는 걸까? 그 해답은 다음 글에서 설명할 Service에서 찾을 수 있다.
한달에 두세개는 블로그를 써야지 하고 생각했는데, 마음처럼 쉽지가 않은 것 같다.
좀 더 꾸준히 글을 쓰는 습관을 만들어가려고 노력 중이다. (진짜!)
AWS 환경에서 K8s 클러스터를 구축하기 위해서 기부도 받았기 때문에 AWS에 K8s 클러스터를 구축해보고(EKS 정식 릴리즈는 아직 시간이 좀 더 필요한 것 같으니) 그 과정에서 겪은 시행착오, 경험담을 블로그를 통해서 조만간 공유할 수 있기를 바라본다.